From Clicks to Customers – Closing the SEO Attribution Gap
One of the biggest headaches in digital marketing is proving the real impact our online efforts have on actual business results. The journey a customer takes is kind of split into two worlds, and they don’t talk to each other very well.
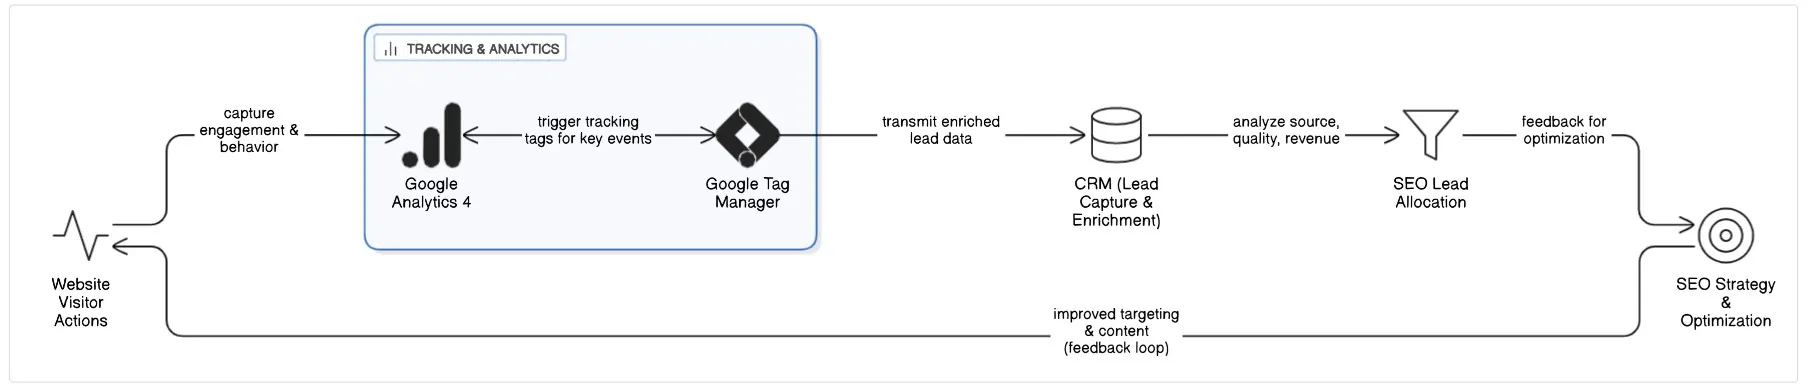
On one side, you’ve got tools like Google Analytics 4. They’re great at showing you what’s happening at the very start. Someone Googles something, lands on your site, pokes around a bit. All that anonymous top-of-funnel activity is carefully tracked.
But the moment someone fills out a lead form and enters the CRM? It’s like the lights go out on the analytics side. From there, you’re dealing with identified leads, how they’re qualified, what stage they’re in, if they eventually bring in revenue, and it’s all happening on the CRM platform. The problem is that “black box” in the middle. You can’t easily connect what happens in GA4 with what happens in your CRM, so the marketing team can’t clearly prove how much money their efforts are really bringing in. Especially when it comes to longer-term strategies like SEO.
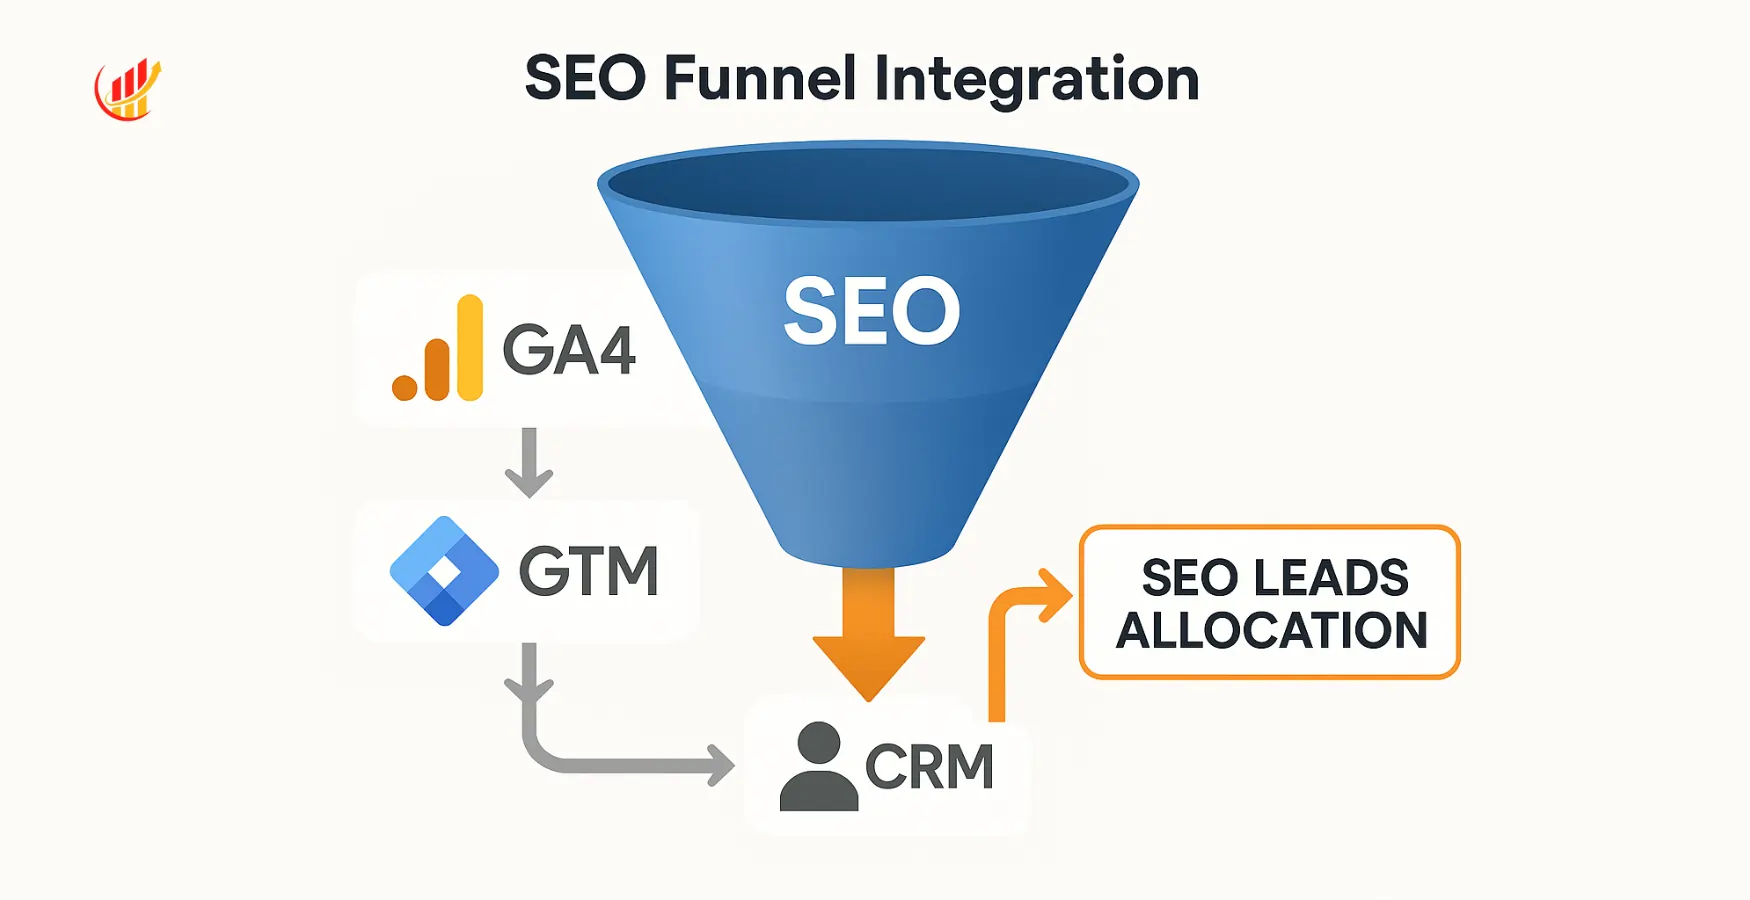
The solution to this attribution gap is not found within a single platform but in the strategic and technical integration of three core components of the modern marketing technology stack: Google Analytics 4 (GA4), Google Tag Manager (GTM), and the organization’s CRM. By architecting a seamless data flow between these systems, businesses can construct a unified view of the entire customer journey. This integrated architecture makes it possible to move beyond surface-level metrics like lead volume and instead measure performance based on meaningful business results, such as the number of sales-qualified leads (SQLs) or the revenue generated from specific marketing campaigns.
My goal with this report is to provide you with a comprehensive, step-by-step technical blueprint for implementing this crucial three-platform integration. The end goal is to empower marketing and sales operations teams to accurately attribute leads and their subsequent value, captured within the CRM, back to their originating traffic source in GA4, with a specific focus on isolating and quantifying the impact of SEO.
To achieve this, the report will navigate through three distinct and sequential phases of implementation.
- First, the Data Capture phase will detail how to leverage Google Tag Manager to harvest critical user and session identifiers directly from the website.
- Second, the Data Transfer phase will outline the mechanics of passing this captured data into the CRM upon lead submission and, crucially, the process for sending offline conversion events from the CRM back to GA4 to “close the loop.”
- Finally, the Analysis & Activation phase will demonstrate how to build custom reports and funnels within GA4 to visualize the complete journey and how to leverage this newly unified dataset for more intelligent marketing and advertising strategies.
Architecting the Data Bridge – Foundational Concepts and Preparation
Before implementing any code or configuring tags, establishing a solid conceptual and technical foundation is paramount. This initial phase involves understanding the key data element that connects the entire system, auditing the prerequisite capabilities of each platform, and preparing the CRM to receive and store the necessary attribution data. This groundwork ensures that the subsequent technical implementation is built on a stable and scalable architecture.
The Unified User Journey: The client_id as the Golden Thread
At the heart of this integration is a single, critical piece of data: the Google Analytics client_id. This identifier serves as the “golden thread” that stitches together an anonymous user’s online behavior with their eventual identity as a lead or customer in the CRM. The client_id is a unique, randomly generated string that GA4 assigns to a user’s browser or device upon their first visit to a website. It is stored in a first-party cookie named _ga and is used by Google Analytics to distinguish between new and returning visitors and to associate multiple sessions and interactions with the same user (device).
The end-to-end data flow hinges on the successful capture and transfer of this identifier. The process unfolds as follows:
- A user arrives on the website from a Google search.
- The GA4 tracking script fires, generating a unique client_id and storing it in the user’s browser cookie.
- The user navigates the site and submits a lead generation form.
- At the moment of submission, the client_id is captured from the cookie and passed along with the standard form data (name, email, etc.) into the CRM.
- Days or weeks later, a sales representative qualifies this lead in the CRM, changing its status to “Sales Qualified Lead.”
- This status change triggers an automated process in the CRM to send an “offline conversion” event back to GA4. This event payload includes the original client_id that was stored with the lead record.
- GA4 receives this event and uses the client_id to link it back to the user’s original session, correctly attributing the offline sales qualification to the initial visit from organic search.
It is important to distinguish the client_id from the user_id. While the client_id identifies a specific browser on a specific device, the user_id is an identifier that a business assigns to a user when they log in to an account. The user_id is more powerful because it allows for tracking a single individual across multiple devices (e.g., phone, desktop, tablet), providing a true person-centric view of the customer journey.4 While this guide focuses on the
client_id due to its universal applicability to all website visitors (both anonymous and known), a mature attribution system should incorporate user_id tracking for authenticated users to achieve the highest level of accuracy. The client_id provides a device-centric model, which is a necessary and powerful first step, but the ultimate goal for businesses with user accounts is a person-centric model powered by the user_id.
Prerequisite System Audit & Best Practices
Before beginning the implementation, a thorough audit of system access and capabilities is required to ensure a smooth process.
- Access Requirements: The project requires specific permission levels across the three platforms. In Google Analytics 4 and Google Tag Manager, “Editor” or “Administrator” access is necessary to create custom dimensions, configure tags, and publish container changes.9 Within the CRM, administrative privileges are needed to create custom fields and configure the automation tools, such as webhooks or workflow rules, that will send data back to GA4.
- Tool Functionality Check: The chosen CRM must support several key features. It needs a “web-to-lead” or equivalent form functionality that allows for the creation of new lead records from website submissions.3 Critically, it must allow for the creation of custom fields to store the incoming analytics data. Finally, it must possess an automation engine, such as Salesforce Flow or HubSpot Workflows, that can be configured to trigger an outbound webhook or integrate with a middleware platform like Zapier when a field value changes (e.g., lead status is updated).
- Data Privacy and PII: A strict adherence to data privacy policies is non-negotiable. Google’s terms of service explicitly prohibit sending Personally Identifiable Information (PII)—such as raw email addresses, names, or phone numbers—to be stored in Google Analytics.1 The integration described in this report is compliant by design, as it relies on the
client_id, which is a pseudonymous identifier. Any sensitive data used for identification purposes must be hashed before being transmitted to Google’s servers.
1.3 Preparing Your CRM for Analytics Data
The CRM must be prepared to receive and store the attribution data that will be sent from the website. Standard CRM fields are designed for sales and contact information, not marketing analytics. Therefore, creating a dedicated set of custom fields is the first practical step. This not only provides a clean repository for the data but also makes it available for reporting and automation within the CRM itself.
The process for creating custom fields varies by CRM platform but generally follows these steps:
- Navigate to the CRM’s administrative settings or object manager.
- Select the object where the data will be stored (typically “Lead” and “Contact,” and potentially “Opportunity”).
- Initiate the process to create a new custom field.
- Select the appropriate data type. For most attribution data, a “Text” field is suitable.
- Define the field’s properties, including its user-facing “Field Label” and its system-level “API Name,” which will be used in the integration.
- Configure field-level security to determine which user profiles can view and edit the field.
- Add the newly created field to the relevant page layouts so that sales and marketing users can see the data on the record pages.
For Salesforce, this process is managed in Setup > Object Manager > Lead > Fields & Relationships. Text fields should be created with a recommended length of 255 characters to accommodate various parameter values. For
HubSpot, this is done in Settings > Properties, where new contact properties can be created and organized into a dedicated property group for clarity, such as “GA4 Attribution”.
Creating discrete fields for each attribution parameter, rather than a single generic “Source” field, is a critical architectural decision. It mirrors the multi-dimensional nature of GA4’s traffic source data (source, medium, campaign, etc.). This approach enables far more granular reporting and segmentation
within the CRM. For instance, a sales manager can build a report to see which specific utm_campaign values are generating leads that convert to high-value opportunities, creating a shared data language between sales and marketing and empowering the sales team with valuable context about a lead’s origin.
The following table outlines the essential custom fields to create in the CRM.
|
Field Label (Example) |
API Name (Example) |
Data Type |
Purpose & Notes |
|
GA Client ID |
GA_Client_ID__c |
Text (255) |
Crucial. Stores the unique GA4 identifier. This is the key for linking data back to GA4. 3 |
|
Session Source |
Session_Source__c |
Text (255) |
Stores the source of the session (e.g., ‘google’, ‘bing’). 23 |
|
Session Medium |
Session_Medium__c |
Text (255) |
Stores the medium of the session (e.g., ‘organic’, ‘cpc’). 23 |
|
Session Campaign |
Session_Campaign__c |
Text (255) |
Stores the campaign name from UTM parameters. 23 |
|
Session Term |
Session_Term__c |
Text (255) |
Stores the keyword from UTM parameters. 23 |
|
Session Content |
Session_Content__c |
Text (255) |
Stores the ad content from UTM parameters. 23 |
|
Landing Page URL |
Landing_Page_URL__c |
URL / Text (255) |
Stores the first page the user visited in the session. Critical for SEO analysis. 25 |
Capturing Attribution Data with Google Tag Manager (GTM)
With the CRM prepared, the next phase focuses on the client-side implementation within Google Tag Manager. GTM will act as the data collection engine, responsible for reading user and session information from the browser and dynamically injecting it into the website’s lead forms before submission. This section provides the technical steps to configure the necessary variables, tags, and triggers.
Capturing the GA4 client_id
The primary task is to reliably extract the client_id from the user’s browser. There are two robust methods to accomplish this within GTM.
- Method 1 (Recommended): 1st Party Cookie Variable
This is the most direct method. It involves creating two variables in GTM.
- Create a 1st Party Cookie Variable: Navigate to Variables > User-Defined Variables > New. Select “1st Party Cookie” as the variable type. In the “Cookie Name” field, enter _ga. This variable will read the full value of the _ga cookie (e.g., GA1.1.123456789.987654321).
- Create a Custom JavaScript Variable to Parse the ID: The full cookie value contains more than just the client_id. A second variable is needed to parse it. Create a new “Custom JavaScript” variable. This variable will reference the cookie variable created in the previous step and use a simple JavaScript function to extract only the client ID portion. Assuming the 1st Party Cookie variable was named ga cookie, the code would be:
JavaScript
function() {
try {
return {{ga cookie}}.substring(6);
} catch(e) {
return undefined;
}
}
This script takes the full cookie string and removes the initial GA1.1. prefix, returning only the desired client_id (e.g., 123456789.987654321).
- Method 2 (Alternative): GTAG GET API Template
This method uses a community-provided template to interact with the gtag.js library directly.
- Add the Template: Navigate to Templates > Tag Templates > Search Gallery and search for “GTAG GET API”. Add this template to the workspace.
- Create the API Tag: Create a new tag using the “GTAG GET API” template. Enter the GA4 Measurement ID. Save the tag without a trigger.
- Configure Tag Sequencing: Open the main GA4 Configuration tag (the one that fires on all pages). Under Advanced Settings > Tag Sequencing, check the box to “Fire a tag after fires” and select the GTAG GET API tag created in the previous step. This ensures the API call is made only after GA4 has initialized.
- Create a Data Layer Variable: This setup will push an event named gtagApiGet to the data layer, containing the client_id. To capture this, create a new “Data Layer Variable” with the “Data Layer Variable Name” set to gtagApiResult.client_id.
Regardless of the method chosen, validation is crucial. Use GTM’s Preview Mode, navigate to the website, and on the “Container Loaded” or gtagApiGet event, check the Variables tab to confirm that the client_id variable is being populated with the correct value.
Capturing Traffic Source & SEO-Specific Data
To attribute the lead correctly, especially to SEO, GTM must capture the traffic source information for the session.
- UTM Parameters: For paid and email campaigns, UTM parameters are the standard. Create a series of “URL” variables in GTM. For each one, set the “Component Type” to “Query” and enter the respective “Query Key”: utm_source, utm_medium, utm_campaign, utm_term, and utm_content. This allows GTM to read these values directly from the page URL when a user arrives from a tagged link.
- Organic Source Identification: The core of the user’s request is to identify SEO traffic. This traffic rarely has UTM parameters. The logic must be built in GTM to identify it based on the referring domain. The built-in “Referrer” variable captures the URL of the previous page. A “Lookup Table” or “Custom JavaScript” variable can be created to implement the following logic:
- Condition: If the {{Referrer}} variable contains “google,” “bing,” “duckduckgo,” etc., AND the {{utm_medium}} variable is not set (or is not “cpc”).
- Output: Set the Session Medium variable to “organic” and the Session Source variable to the name of the search engine. This logic ensures that organic search traffic is correctly classified.
- Landing Page: The first page a user sees in their session is a critical data point for SEO analysis. This can be captured using the built-in “Page Path” variable. For greater accuracy, especially on sites where users may navigate extensively before converting, this value should be captured on the first page view of a session and stored in a session-level cookie. A subsequent GTM variable can then read this cookie, ensuring the initial landing page is always associated with the lead, not the page where the form was submitted.
Engineering the Data Handoff: Hidden Fields & Dynamic Population
The final client-side step is to pass the captured data into the lead generation form so it can be sent to the CRM. This is achieved by adding hidden fields to the form’s HTML and then using GTM to populate them dynamically.
- Adding Hidden Fields to Your Form: The website’s HTML form must be modified to include <input type=”hidden”> elements for each piece of data being captured. These fields are invisible to the user but are submitted along with the visible fields.34 It is essential that each hidden field has a unique
id for JavaScript to target it, and a name attribute that the CRM will use to map the value to the correct custom field. - Example HTML:
HTML
<form action=”/submit-lead” method=”POST”>
<label for=”email”>Email:</label>
<input type=”email” id=”email” name=”email”>
<input type=”hidden” id=”ga_client_id_field” name=”ga_client_id_field” value=””>
<input type=”hidden” id=”session_source_field” name=”session_source_field” value=””>
<input type=”hidden” id=”session_medium_field” name=”session_medium_field” value=””>
<button type=”submit”>Submit</button>
</form> - The Custom HTML Tag Injector: A “Custom HTML” tag in GTM is used to execute a small piece of JavaScript that finds these hidden fields and fills them with the values from the GTM variables created earlier.
However, on modern websites built with JavaScript frameworks (like React or Angular) or on pages where forms are loaded dynamically (e.g., in a popup modal), the form may not be present in the DOM when the “DOM Ready” event fires. This is a common point of failure. In such cases, a more resilient trigger is necessary. An “Element Visibility” trigger can be configured to fire the script only when the form element itself becomes visible to the user.43 The most robust solution involves collaboration with web developers to have them push a custom
dataLayer event, such as dataLayer.push({event: ‘form_ready’});, once the form has been fully rendered. The Custom HTML tag would then be fired by a “Custom Event” trigger listening for form_ready, guaranteeing the script runs at the correct time.44
- Testing the Handoff: The final step is a thorough end-to-end test using GTM Preview Mode. The user should navigate to a page containing the form, ideally using a URL with test UTM parameters. Using the browser’s developer tools (“Inspect Element”), they must verify that the value attributes of the hidden <input> fields have been correctly populated by the GTM script. This confirms that the data is ready to be sent to the CRM upon submission.
Sending Offline Conversions from CRM to GA4
Once attribution data is successfully captured in the CRM, the next critical phase is to “close the loop” by sending key lead status updates from the CRM back to Google Analytics 4. This server-side process transforms GA4 from a simple web analytics tool into a full-funnel business intelligence platform. It allows marketers to see not just which sources generate leads, but which ones generate valuable leads that progress through the sales pipeline.
Defining Your Offline Conversion Event Schema
Before configuring any technology, it is essential to define a clear event schema in collaboration with the sales team. This ensures that the data sent back to GA4 represents business milestones that are genuinely meaningful for marketing optimization.
- Business Alignment: The goal is to translate sales pipeline stages into GA4 events. A typical progression might look like this:
- Initial Form Submission: A generate_lead event. This is the baseline conversion that happens on the website.
- Sales Acceptance: When a sales development representative (SDR) qualifies the lead, a qualify_lead event is sent. This is often the first and most important offline conversion, as it filters out spam and unqualified inquiries.
- Deal Won: When a lead becomes a paying customer, a close_convert_lead event is sent. This is the ultimate conversion that ties marketing efforts directly to revenue.
- GA4 Recommended Events: It is a strong best practice to use Google’s recommended event names for lead generation (generate_lead, qualify_lead, close_convert_lead, etc.). Adhering to this standard naming convention may unlock specialized reporting features and audience templates within the GA4 interface in the future.
- Event Parameters: Each event should be enriched with parameters that provide valuable context. For a close_convert_lead event, the most critical parameters are value (the monetary value of the deal) and currency. This allows for direct ROI calculation within GA4.48 Other custom parameters, such as lead_source_crm, can also be sent back to GA4 to create custom dimensions for deeper analysis.
The Real-Time Path: GA4 Measurement Protocol
The primary mechanism for sending data from a server-side system like a CRM to GA4 is the Measurement Protocol (MP). The MP is an API that allows developers to make HTTP POST requests containing event data directly to Google Analytics servers. It is designed to augment the data collected by the client-side GTM/gtag.js script, not to replace it.
- Authentication: measurement_id & api_secret: To send data via the MP, two credentials are required.
- measurement_id: This is the unique identifier for the GA4 data stream (e.g., G-XXXXXXXXXX). It can be found in the GA4 interface under Admin > Data Streams > **.
- api_secret: This is a secret key used to authenticate the requests. It must be generated within the same data stream settings page under the “Measurement Protocol API secrets” section. It is crucial to store this key securely and not expose it in any client-side code.
- Constructing the JSON Payload: All MP requests must be sent as an HTTP POST request to the endpoint https://www.google-analytics.com/mp/collect. The body of the request must be a JSON object with a specific structure.
- Example Payload for a Qualified Lead:
JSON
{
  "client_id": "123456789.987654321",
  "events": [{
    "name": "qualify_lead",
    "params": {
      "session_id": "1701234567",
      "engagement_time_msec": "100",
      "timestamp_micros": "1701234567890123"
    }
  }]
}- Required vs. Recommended Parameters:
- Required: The client_id (retrieved from the CRM custom field) and the name of the event are the absolute minimum requirements.
- Highly Recommended for Attribution: For GA4 to correctly attribute the offline event to the user’s original online session, including the session_id is critical. Without it, GA4 may not be able to link the event to the initial traffic source, causing it to be attributed as (direct) / (none) or (not set). The timestamp_micros parameter is also vital, as it allows the event to be recorded at the time it actually occurred in the CRM, rather than when the MP hit was sent. Events can be backdated up to 72 hours.
- Validation: Before implementing the integration in a production environment, developers must use the Measurement Protocol Validation Server. By sending requests to the debug endpoint (/debug/mp/collect instead of /mp/collect), they will receive a JSON response detailing any errors in the payload format or parameters, which is invaluable for troubleshooting.
Automating the Data Push with CRM Webhooks
To automate this process, the CRM needs to be configured to send a notification whenever a lead’s status changes. This is typically accomplished using webhooks.61 A webhook is an automated HTTP POST request that the CRM sends to a specified URL when a trigger event occurs.
This webhook cannot be sent directly to the GA4 Measurement Protocol endpoint because the payload format will not match. An intermediary service is required to receive the webhook from the CRM, transform the data into the correct GA4 MP JSON format, and then forward the request to Google’s servers. This intermediary can be a no-code/low-code platform like Zapier or Make, or a custom-developed serverless function (e.g., Google Cloud Function, AWS Lambda, Azure Function) for more complex or high-volume scenarios.
- Configuration Guide for Salesforce: Salesforce’s automation can be built using its Flow Builder.
- Create an Outbound Message: In Salesforce Setup, create a new “Outbound Message.” Specify the endpoint URL of the intermediary service and select all the custom fields (e.g., GA_Client_ID__c, Session_Source__c) and standard fields (e.g., Status, Amount) that need to be sent in the payload.
- Create a Record-Triggered Flow: Build a new “Record-Triggered Flow” that initiates when a Lead or Opportunity record is created or updated.
- Set Trigger Conditions: Configure the entry conditions for the flow to run only when the Status field is changed to a specific value (e.g., “Qualified” or “Closed Won”).
- Add Action Element: In the flow canvas, add an “Action” element and select the Outbound Message created in the first step. This links the trigger condition to the webhook action.
- Configuration Guide for HubSpot: HubSpot’s Workflows provide a native and user-friendly way to configure webhooks.
- Create a Workflow: Navigate to Automation > Workflows and create a new contact-based or deal-based workflow.
- Set Enrollment Triggers: Define the enrollment trigger based on a property change. For example, “Lifecycle stage is any of Sales Qualified Lead” or “Deal stage is any of Closed Won”.
- Add Webhook Action: Add a new action to the workflow and select “Send a webhook.”
- Configure the Webhook: Set the “Method” to POST and enter the endpoint URL of the intermediary service. Use the “Customize request body” option to select the specific HubSpot properties (like the custom “GA Client ID” property) that should be included in the webhook payload. This gives precise control over the data being sent.
Alternative Paths: Data Import & No-Code Middleware
While a real-time webhook and Measurement Protocol integration is the most powerful solution, other methods exist that may be more suitable depending on technical resources and business needs.
- GA4 Data Import: GA4 has a built-in Data Import feature that allows for the uploading of offline event data via CSV files. This process involves exporting lead data from the CRM (including the
client_id and event details like status and timestamp), formatting it according to Google’s required schema, and then manually uploading it in the GA4 Admin panel (Admin > Data Import). This method is effective for batch updates (e.g., daily or weekly) and is less technically demanding, but it lacks the real-time feedback needed for timely campaign optimization. - Zapier/Make as Middleware: Platforms like Zapier or Make can act as the intermediary service, drastically simplifying the integration and removing the need for custom code.1 The workflow (or “Zap”) would be configured as:
- Trigger: A CRM-specific trigger, such as “Updated Deal Stage in HubSpot” or “Updated Record in Salesforce”.
- Action: A “Custom Request” action using the “Webhooks by Zapier” app. This action would be configured to send a POST request to the GA4 Measurement Protocol endpoint. The body of the request would be constructed in the Zapier interface, mapping the data fields from the CRM trigger (like the captured client_id) into the required JSON format for the MP payload.
The choice between these methods reflects a maturity model. Data Import is a simple way to begin enriching GA4 data. Middleware platforms like Zapier offer a quick, no-code path to near-real-time integration, ideal for piloting the system or for businesses with moderate lead volume, though costs can scale with usage. A custom-coded serverless function offers the most control, scalability, and lowest long-term operational cost, making it the preferred solution for enterprises or businesses with high lead velocity. It allows for complex data transformations, robust error handling, and is the most future-proof architecture.
Analysis and Activation in GA4
With the data capture and transfer mechanisms in place, the final phase focuses on leveraging the newly integrated data within Google Analytics 4. This involves validating that the data is flowing correctly, building custom reports to analyze SEO lead performance, visualizing the full sales funnel, and activating the data for more intelligent marketing campaigns.
Validating the Full-Circle Integration
Before building reports, it is essential to verify that the offline conversion events sent from the CRM are being received and processed correctly by GA4.
- Using DebugView: The primary tool for real-time validation is DebugView, located in the GA4 Admin panel. When a test event is sent from the CRM via the Measurement Protocol, it should appear in the DebugView timeline within seconds. Clicking on the event in the timeline will display all the parameters that were sent with it, allowing for immediate verification that the client_id, session_id, event name, and any other custom parameters are being received as expected.
- Checking Realtime Reports: While DebugView is for granular event inspection, the standard Realtime report provides a higher-level confirmation. The “Event count by Event name” card should show the names of the offline events (e.g., qualify_lead) as they are received, confirming that they are being processed by GA4.
- Data Processing Latency: It is important to note that while events appear in real-time tools instantly, it can take 24 to 48 hours for this data to be fully processed and reflected in standard reports and the Explorations tool. This delay is normal and should be factored into any analysis of newly integrated data.
Building the SEO Lead Performance Report
The central goal of this integration is to determine which SEO efforts are generating valuable leads. A custom report in GA4’s “Explore” section is the ideal tool for this analysis.
- Objective: To create a report that lists organic search landing pages and shows the count of offline conversion events (like “Qualified Lead” or “Deal Won”) that originated from sessions starting on those pages.
- Step 1: Navigate to Explorations: In the left-hand navigation of GA4, click Explore and select to create a new “Free-form” exploration.
- Step 2: Configure Variables: In the Variables column on the left, click the “+” icon to import the necessary dimensions and metrics.
- Dimensions: Search for and import Landing page + query string and Session source / medium. If any custom parameters were sent back from the CRM (e.g., lead_source_crm), they should be registered as custom dimensions in GA4 and imported here as well.
- Metrics: Import Sessions, Total users, and Event count.
- Step 3: Configure Tab Settings: In the central Tab Settings column, drag and drop the variables to build the report structure.
- Rows: Drag Landing page + query string from the Variables panel to the Rows section.
- Columns: Drag Event name to the Columns section. This will create a separate column for each unique event.
- Values: Drag Event count to the Values section. This will populate the table with the number of times each event occurred.
- Step 4: Apply Filters: This is the most critical step to isolate the specific data required.
- Drag the Session source / medium dimension to the Filters section. Configure the filter to exactly match google / organic. This ensures the report only includes data from sessions initiated by Google organic search.
- Drag the Event name dimension to the Filters section. Configure this filter to match the specific offline conversion events of interest. For example, set the condition to is one of and select qualify_lead and close_convert_lead.
The resulting table will provide a clear, actionable view. Each row will represent a specific landing page that attracted organic search traffic, and the columns will show how many of those visitors ultimately became qualified leads or closed deals, directly answering the user’s primary question.
Creating a Full-Funnel Visualization
To understand the conversion efficiency at each stage of the journey, a Funnel Exploration report is invaluable. This visualization shows the progression of users through a predefined series of steps, highlighting drop-off rates at each stage.81
- Step 1: Create a Funnel Exploration: In the Explore section, select the “Funnel exploration” template.
- Step 2: Define Funnel Steps: In the Tab Settings column, configure the steps of the funnel to represent the entire SEO-to-sales journey.
- Step 1: Organic Visit: Define this step using the session_start event. Add a filter to this step so it only includes sessions where Session source / medium is google / organic.
- Step 2: Lead Generated: Define this step using the generate_lead event (or the relevant form submission event).
- Step 3: Lead Qualified: Define this step using the qualify_lead event sent from the CRM.
- Step 4: Deal Won: Define this step using the close_convert_lead event sent from the CRM.
This funnel visualization will clearly display the number of users who started an organic session and how many of them progressed through each subsequent stage in the sales process. It immediately identifies the largest points of friction and drop-off, whether it’s between the initial visit and lead submission or between lead qualification and closing the deal.
Strategic Activation of Integrated Data
The value of this integration extends far beyond reporting. The unified data creates a powerful asset that can be used to actively improve marketing and advertising performance.
- Building High-Value Audiences: One of the most potent applications is the creation of GA4 Audiences based on the offline CRM events. For example, an audience can be created for “All users who have triggered the close_convert_lead event”.1 This segment represents the business’s most valuable customers. Another useful audience would be “All users who have triggered
qualify_lead but not close_convert_lead,” representing the active sales pipeline. - Google Ads Integration: Once these audiences are created, they can be shared with a linked Google Ads account and used for sophisticated campaign strategies.
- Exclusion Targeting: The “Customers” audience (close_convert_lead) can be used as an exclusion list for prospecting campaigns. This prevents wasting ad spend on acquiring users who are already customers.
- Lookalike Audiences: The same “Customers” audience can be used as a seed list for Google Ads to create a “Similar Audience.” The platform’s machine learning algorithms will then target new users who share characteristics and behaviors with the business’s best customers, dramatically improving targeting efficiency.
This activation strategy represents a fundamental shift from channel-based optimization (e.g., optimizing for clicks from organic search) to audience-based optimization. By feeding actual business outcomes from the CRM back into the advertising ecosystem, marketing campaigns are no longer optimizing for top-of-funnel proxies but for bottom-of-funnel results. The SEO data, enriched by the CRM, becomes the fuel for more intelligent and efficient paid media buying, creating a powerful synergistic loop between marketing channels.
Conclusion: Maintaining a High-Fidelity Attribution System
The integration of Google Analytics 4, Google Tag Manager, and a CRM system represents the construction of a powerful, end-to-end attribution engine. This architecture successfully dismantles the data silos that traditionally separate marketing activities from sales outcomes, providing a clear line of sight from an initial website click to eventual revenue. By meticulously capturing the client_id and passing it through the entire customer lifecycle, organizations can finally quantify the true business impact of their SEO and other top-of-funnel marketing channels.
Successfully implementing this system is not a one-time project but the establishment of a foundational data architecture that requires ongoing monitoring and governance to maintain its integrity and value. Best practices for maintenance include periodically auditing the CRM to ensure a high fill rate for the custom attribution fields, monitoring for webhook failures in the intermediary system, and regularly reviewing GA4 reports for any unexpected increases in (not set) or (direct) attribution for offline conversion events, which could indicate a break in the session_id or client_id chain.
Furthermore, strong data governance is essential. The logic of the integration is tightly coupled with the processes and data structures within the CRM. If the sales team decides to change the names or values of lead status fields without consulting the marketing operations team, the CRM automations that trigger the webhooks will fail. Maintaining a shared data dictionary and fostering clear, consistent communication between marketing, sales, and IT departments is crucial for the long-term health of the attribution system.
Ultimately, this unified data system transforms an organization’s capabilities. It moves beyond simple performance reporting to enable more accurate forecasting based on pipeline velocity from different channels, smarter budget allocation toward initiatives that demonstrably drive revenue, and a fundamentally deeper understanding of the complete customer journey.1 This integration is a strategic imperative for any organization seeking to become truly data-driven.
Works cited
- Unify CRM + GA4: The Key to Unlocking Full-Funnel Attribution – SR analytics, accessed on August 2, 2025, https://sranalytics.io/blog/crm-and-ga4-integration/
- Offline Conversion Tracking in Google Analytics – Tutorial – Optimize Smart, accessed on August 2, 2025, https://www.optimizesmart.com/tracking-offline-conversions-in-google-analytics/
- How to track leads in Google Analytics via CRM – Optimize Smart, accessed on August 2, 2025, https://www.optimizesmart.com/learn-to-track-qualified-and-won-leads-in-google-analytics/
- A Guide to Google Analytics Client ID (2025), accessed on August 2, 2025, https://www.analyticsmania.com/post/google-analytics-client-id/


Leave a Comment